
< Previous week | Lecture and Studio Notes index | Next week >
Lecture 7: FooCamper's Guide to BioEngineering
Lecture 6: Backyard Biology
"The new techniques, which permit combination of genetic information from very different organisms, place us in an area of biology with many unknowns."
- From: Berg, P., et al. "Summary Statement of the Asilomar Conference on Recombinant DNA Molecules." PNAS 72, no. 6 (1975): 1981-1984.
Starting today and continuing into the next two weeks, we'll consider intentional manipulation of DNA. During this time we'll consider some of the scientific advances that have enabled genetic engineering. For instance, almost any string of genetic material can now be reliably re-ordered. Additionally, the cross-species barriers to DNA transfer have been reduced to a point that its now commonplace to get a gene of interest expressed in an organism even when that gene came from a wholly different critter. These feats would have seemed like science fiction just 50 years ago when Watson and Crick published the double helical structure for DNA. And just as a replication mechanism did not escape Watson and Crick's attention when they described DNA's structure, the potential for positive and negative outcomes from recombinant DNA techniques did not escape anyone's notice when these techniques were developing. Everyone took notice: the scientists involved, the government oversight groups, the media and the public. As a class, we will consider some of the ethical, legal and policy issues that arose with the advent of recombinant DNA technology. But today we'll step back and consider the DNA material itself.
- Is DNA (the physical material) inherently dangerous?
- What makes it (or could make it) dangerous?
- How can you tell if it's dangerous?
- Are there special places that DNA (the physical material) should be kept?
- Are there rules that can be enforced about its manipulation?
|
Why are we doing this?? If you've spent time in a research lab, there's a good chance you've worked with DNA there. But is that the only place DNA can be manipulated? What if the techniques and facilities for manipulating DNA were available to everyone? What if they already are? If you've never spent time working with DNA, then you're in for a treat. Today you'll isolate and purify some DNA using materials found in most any kitchen or garage. And from this challenge, you'll be better able to judge the capabilities and possibilities of "amateur bioengineering." |
Challenge: Backyard Biology
Part 1: Cookin' up some DNA in your Kitchen
This protocol is from Karen Kalumuck at San Franscisco's Exploratorium. Another variation can be found on the University of Utah's Learn.Genetics site.
Materials
- Frozen Strawberries
- Seal-able plastic "baggies" (sandwich and gallon)
- No 2 Coffee Filters
- 6% solution of NaCl (dissolve 1/2 tablespoon salt in 1/2 cup water)
- 25% strength liquid dish soap (1 part liquid soap into 3 parts water)
- Eye droppers
- 70% Isopropanol
- Toothpicks or coffee stirrer
Steps
- Obtain 2 small to medium sized strawberries
- Place them in a sandwich-sized seal-able plastic baggie.
- Add about 1/2 a cup of the 6% NaCl solution, and seal the bag.
- Squash the strawberry in the salt solution thoroughly, while it's in the baggie. Try to break up large pieces of berry into mush.
- Add about 2 tablespoons of the detergent solution. Seal the baggie and gently mix the berry mush with the detergent. Avoid producing bubbles/foam.
- Optional clean up step: Put the entire extraction (strawberry goo, salt, detergent) through a filter -- coffee filter over a cup is just fine. This gets rid of a lot of the stringy strawberry goo, and the extraction is cleaner. Place the cleaned up material that passes through the filter into a new baggie.
- Hold the baggie by one of the upper corners so that the mush accumulates in a corner of the baggie. Use a pipette or dropper to gently trickle down about 10 - 20 ml of alcohol down a side crease of the baggie. The alcohol should layer onto the surface of the mush. Hold the bag still (or VERY gently rock back and forth) for 1 minute.
- Observe what's happening at the interface. You should use a coffee stirrer to "spool" up the material at the interface, to save for next time.
Part 2: Lego™phoresis
Cast Your Gel
This design is a variation of one published in Make Magazine Volume 7 "Backyard Biology."
Materials
- small plastic container
- scissors
- masking tape
- Lego blocks
- agar-agar
- running buffer
- 500 ml bottled water
- pinch of table salt
- 1/4 tsp baking soda
- Aquarium pH kit to check pH ~7.5
- adjust with more water or baking soda as needed
- microwave
Note: you'll cast your gel this time and run the DNA through it next time.
Design
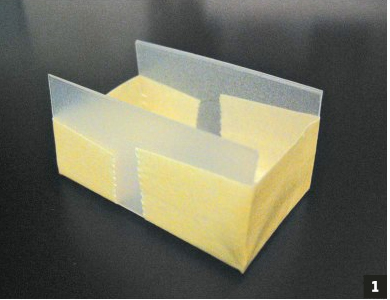
1. Cut ends off small container and tape closed. (Courtesy of Make Magazine. Used with permission.)
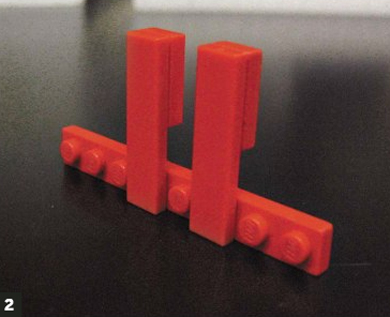
2. Arrange Legos for casting wells. (Courtesy of Make Magazine. Used with permission.)
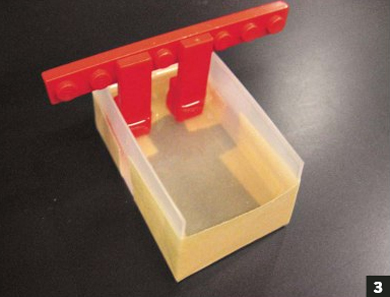
3. Melt 1/2 tablespoon agar-agar with 1/2 cup running buffer in a paper cup and pour gel ~1cm thick. Lego casting wells should be embedded in agar-agar while liquid but not touch bottom of container. You might consider resting the casting tray in a larger container in case the tape leaks. (Courtesy of Make Magazine. Used with permission.)
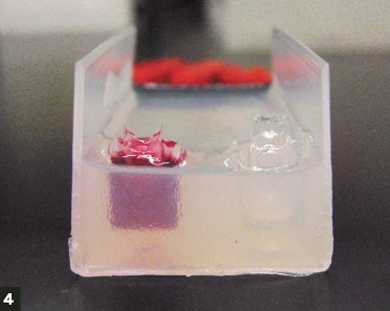
4. Once gel has solidified, remove Legos, tape and add DNA with glycerin/red food coloring. (Courtesy of Make Magazine. Used with permission.)
Homework
Due at this week's Studio session.
Studio 4: Nip and Tuck
In today's studio, project teams will be assigned. These teams are loosely grouped around common interests, be they project areas or project approaches. Once you have assembled into your groups, be sure to introduce yourselves, exchange contact information and figure out which interests landed you on the same team. Then you can use the rest of the studio time to work on your team's "facebook" page and your "team contract." The required content for each is:
Team Facebook Page
- a name for your team
- the names of your team members
- the names of your team mentors (20.902 students who will be the go-to folks for questions and guidance on your project)
- what challenge your team will address
- what ideas you have agreed to work on (at least 3, no more than 5)
As you develop your ideas, you might also want to keep in mind the requirements for your "3 ideas presentations" that will take place in two weeks. Think about what you will have to present, and how you would like to present it. Maybe the work could/should be divided up or maybe you need to hash out ideas on the spot together. You will use the time today and all of next week studio time to make real progress on these high level questions about your project.
Team Contract
These team building tools have been developed by MIT's Gordon Engineering Leadership Program, appreciating that teamwork and leadership underlie nearly all successful engineering projects.
Start by reading (independently) this short article that describes the different kinds of teams that exist and some common stages that teams go through.
Philips, Patricia. "So, You're Going to be a Member of a Team." Chemical Engineering Progress 93, no. 1 (January 1997): 141-144
Once everyone has finished reading, discuss the article as a group, paying particular attention to team and individual roles and responsibilities as they may relate to your particular project and team.
Then as a team, work through the following questions in order to form your team contract. You can work through the questions fast or slow, all of them or just a few. After considering these questions, write a team contract that you can all agree to work with for the rest of this term.
Questions To Consider To Create a Team Contract
These questions have been adapted from Lori Breslow's work at MIT for the subject, 15.279 Management Communication for Undergraduates (source: "Teamwork Questionnaire" the Study Materials section of this class in MIT OpenCourseWare).
Part 1: Goals
- What are the goals of the team?
- What are your personal goals for this assignment?
- What kind of obstacles might you encounter in reaching your goals?
- What happens if all of you decide you want to get an “A,” but because of time constraints, one person decides that a “B” will be acceptable?
- Is it acceptable for two or three team members to do more work in order to get an “A”?
Part 2: Meeting Norms
- Do you have a preference for when meetings will be held? Did you have a preference for where they should be held?
- How often do you think the team will need to meet outside of class? How long do you anticipate meetings will be?
- Will it be ok for team members to eat during meetings?
Part 3: Work Norms
- How much time per week do you anticipate it will take to make the project successful?
- How will work be distributed?
- How will deadlines be set?
- How will you decide who should do which tasks?
- What will happen if someone does not follow through on a commitment (e.g., missing a deadline, not showing up to meetings)?
- How will the work be reviewed?
- What happens if people have different opinions on the quality of the work?
- What will you do if one or more team members are not doing their share of the work?
- How will you deal with different work habits of individual team members (e.g., some people like to get assignments done as early as possible; others like to work under the pressure of a deadline)?
Part 4: Decision Making
- Do you need 100% approval of each team member before making a decision?
- What will you do if one of you fixates on a particular idea?
Lecture 7: FooCamper's Guide to BioEngineering
Challenge: Lego™phoresis (con't)
Materials
- steel wire
- large plastic container
- loading buffer
- 1/4 tsp glycerine/glycerol
- a few drops red food coloring
- DNA you isolated from strawberries
- remaining running buffer from part 1
- 9V batteries
- Aquarium antimicrobial (ideally 2.3% methylene blue diluted 1:100 in bottled water) to stain DNA in gel after run
9V batteries in series to power DNA through the gel. (Courtesy of Make Magazine. Used with permission.)
Homework
PDP8: Recombinent DNA and Asilomar
Due at next class session.
< Previous week | Lecture and Studio Notes index | Next week >