< Previous lab day | Module 3 lab index | Next lab day >
Introduction
As you have seen in 20.109 and in the scientific literature, imaging technologies can provide valuable insight into biological systems. Each different imaging method has a particular set of associated advantages and drawbacks. For example, fluorescence microscopy can provide high-resolution images, but the penetration depth at which samples can be viewed is limited (though improved by recent developments such as multiphoton microscopy). Magnetic resonance imaging (MRI) has just the opposite characteristics, and its potential for large-area and deep tissue imaging makes it quite useful in medicine.


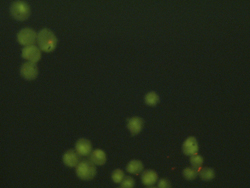
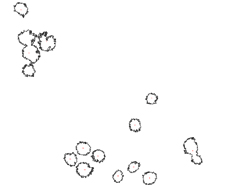
Left: Sample image of live cells for analysis. Right: Sample cell counting result for the image.
Whatever the imaging modality, the resulting plethora of imaging information, especially if at the single-cell level or through multiple sections of a 3D-tissue, requires potent and efficient analysis tools. Many image analysis software packages are commercially available, with varying degrees of user-friendliness, algorithm efficiency, etc. Today, you'll use an open source analysis package from NIH called ImageJ.
Basic image processing includes noise reduction, enhancement of brightness and contrast, thresholding images based on intensity (e.g., everything below a certain intensity value is considered background), and colorizing. For cells, typical analyses include measurement of surface area (i.e., how spread is the cell morphology?), tracking individual cell intensities (as you know from Module 1, these may reflect content of calcium or other molecules of interest), and counting cell populations. In general, analyses that require tracking cells over time are more complicated than static analyses. For example, tracking cell migration typically involves setting thresholds with respect to both intensity and size, then running an algorithm that calculates the centroid of each cell at each time-point and from those centroids the cell's path and velocity. Fully automated tracking can be challenged by cells dropping in and out of the plane of view, crossing paths with other similar-looking cells, or just moving very quickly. On the other hand, fully manual tracking—which utilizes the power the human eye to avoid mistracking cells—is tedious and time-consuming, not to mention that it will still have a non-zero error rate. Thankfully, your focus today will be on static measurements!
Now, let's return to thinking about the structure of cartilage for a bit. Our work in this module has focused on chondrocytes themselves (viability and morphology) and on the ECM protein collagen. While collagen makes up ~50-60% of the dry weight of cartilage tissue, another key feature is a high proteoglycan content of ~ 15-30%. In fact, you may have noticed that many of the papers we looked at on Day 1 assayed proteoglycan content to assess the degree of cartilage formation in a tissue engineered construct. Usually this was done by DMMB (dimethylmethylene blue) staining; several similar compounds, called cationic dyes, bind to negatively charged moieties, a key feature of proteoglycans.
Proteoglycans are proteins carrying glycosaminoglycan (GAG) chains, which commonly include keratan and chondroitin sulfates. Aggrecan is the major proteoglycan in cartilage tissue, and many aggrecan monomers attach to a single hyaluronic acid chain to form large aggregates—hence the name. The many negative side chains of proteoglycans (primarily sulfates and carboxylic acids) repel each other, and contribute to the osmotic swelling properties of cartilage tissue. Proteoglycans are trapped within the collagen matrix, the former being primarily responsible for compressive strength (due to changes in osmotic swelling) and the latter for tensile strength. Proteoglycans also contribute to joint lubrication and response to shearing forces.
Osteoarthritis, the primary disease that cartilage tissue engineering aims to treat, is associated with a loss of proteoglycan content. This in turn reduces the swelling and elasticity of cartilage tissue, and its ability to respond to compressive loads. This leads to collagen degradation, joint inflammation, and cartilage tissue destruction. Thus, a physiological proteoglycan content is of essential importance for an engineered cartilage tissue. For our purposes of tracking basic phenotypic maintenance or de-differentiation of chondrocytes, collagen will serve just as well; however, keep in mind that it tells only part of the story.
Protocols
Part 1: Day 2 of ELISA
- Begin by washing your samples. (Check the protocol on Day 5 for a refresher.) This time do four washes instead of only two - you don't want to amplify the signal from any primary antibody that isn't firmly bound to your samples.
- When you are ready, ask the teaching faculty for some alkaline-phosphatase labeled secondary antibody (this should be diluted at the last minute). Add 100 μL of diluted antibody per well. Incubate for 90 min (at room temperature), and work on Parts 2 and 3 of today's protocol.
- Your final wash step should be very thorough because it again precedes an amplification step. To reduce non-specific binding and improve your signal-to-noise ratio, do four careful washes. In the next step, we are adding the substrate for the alkaline phosphatase enzyme.
- Ask the teaching faculty for development buffer and a pNPP (p-nitrophenyl phosphate) pellet. Vortex until the pellet is fully dissolved in the buffer, then add 100 μL of development solution to each well. Cover your plate with aluminum foil now!
- Every few minutes, check if the samples are becoming yellow. This will most likely take 10-15 minutes for the collagen II plate, and 25-30 minutes for the collagen I plate, but may happen sooner or later.
- The top 1-3 samples in the standards may become bright yellow, while the bottom 1-2 samples may appear very pale yellow. Once again, we have a signal:noise issue. If you wait too long, more samples will become saturated (bright), and the results will be meaningless. If you don't wait long enough, you may miss a positive but low result.
- Use your best judgment! Ideally, look for a couple of your samples (not just the standards) to have developed some colour. However, note that some sample may not have measurable protein content. Feel free to ask the teaching faculty for advice.
- When your samples are ready, add 100 μL of Stop Solution (0.4 M NaOH). A member of the teaching faculty will take the plates to BPEC and read them in the absorbance plate reader at 420 nm.
- You can hang around and analyze your data today (see Part 1 of the Day 7 protocol), or wait until next time.
Part 2: Cross-Group Research Idea Discussion
You should be on your way to becoming an expert on your research topic. You should have been reading and thinking a lot about it and you may feel
- like there's too much to read
- like you have too many ideas and no way to map or prioritize them
- like you don't understand what you're reading
- all of the above.
One of the best ways to help frame the problem for yourself is to discuss it with someone new. Take some time today to talk with someone from another lab group. That group will offer you a fresh ear to consider your proposal. Try to describe your research problem to them. Articulate why it's important. Tell them about some recent, relevant data. Describe what you're proposing to do and what the findings from your experiments might reveal. Throughout your discussion, keep careful track of the questions they ask since these will point you to the confusing concepts or fuzzy parts of your explanation or understanding.
Then be a good listener to hear the proposal that they've been working on. Ask lots of questions. No questions are dumb. You are there to offer a naive ear and seek complete explanations. You will have time at the very end of class to reconvene with your own lab partner to hear how their conversation went. Try to identify repeated questions or concerns since these are probably the holes in the project as it stands. You can rework your proposal based on the conversations you've had.
Part 3: Continue ImageJ Analysis (optional)
Today you can finish any analysis that you did not get to on Day 5, and work on incorporating it in your report.
In your notebook, you should comment on your live/dead and transcript results if you did not do so last time.
For Next Time
- Your Module 3 report will be due before you leave lab next time. Continue working on it.
- Based on the feedback that you got from your peers and/or the teaching faculty today, continue to define your research proposal and update your wiki page with your partner. You do not need to hand anything in, but keep in mind that your talk is one week from today.
Reagent List
- Goat anti-rabbit antibody conjugated to alkaline phosphatase (AP)
- from Bio-Rad
- used at 1:1000 in block buffer (see Day 5 for recipe)
- Bio-rad AP substrate kit
- development buffer
- p-nitrophenyl phosphate tablets
