
« Back to Labs
Contents
- Introduction
-
Interactive and Equipment Stations
- Station 1: Introduction to pipetting (Guided)
- Station 2: Introduction to our microscopes (Guided)
- Station 3: Introduction to making solutions (Self-Guided)
- Station 4: Introduction to pH (Self-Guided)
- Station 5: Introduction to our spectrophotometers (Self-Guided)
- Station 6: Gel documentation station
- Benchwork and Scavenger Stations
- For Next Time
Introduction
There are ten stations for you and your lab partner to visit on your lab tour today. Some will be guided tours with a TA or faculty there to help you and others are self-guided, leaving you and your partner to try things on your own. Your visit to each station should last ~10-15 minutes. It doesn't matter which station you visit first but you must visit them all before you leave today. Afterward, you should have some time remaining to begin the For Next Time assignment, and are strongly encouraged to do so. Your lab practical next time will assess your mastery of a selection of these stations - all are fair game, as is the lab safety material covered in today's pre-lab lecture.
Interactive and Equipment Stations
Station 1: Introduction to Pipetting (Guided)
Someone will show you how to use your pipetmen and then you will use them to dilute a blue dye (0.01% Xylene Cyanol, or XC). Bring your pipetmen, tips, and cuvette rack with you.
- If you have never used pipetmen then you should practice by pipeting 800, 80 and 8 μl of the 0.01% XC stock into eppendorf tubes. XC is not hazardous but it may act as an irritant, and will also stain your clothes. Pipet each volume three times and visually inspect how well the volumes match.
- Using your P20, measure 10, 15 and 20 μl of the 0.01% XC stock solution into the bottom of three cuvettes. Using your P1000, add water to bring the final volume to 1 ml (=1000 μl).
- Using your P200, measure 20, 50 and 100 μl of the 0.01% XC stock solution into the bottom of three more cuvettes. Using your P1000, add water to bring the final volume to 1 ml.
- Using your P1000, measure 100, 200, and 400 μl of 0.01% XC solution into the bottom of three more cuvettes. Add water to bring the final volume to 1 ml.
- With a gloved hand or with a piece of parafilm over the lip of the cuvette, invert each cuvette several times to thoroughly mix the contents.
- Visually compare your dilutions to the reference ones. If time permits, you will read the absorbance of your dilutions in the spectrophotometer so do not throw them away.
Station 2: Introduction to Our Microscopes (Guided)
Much of biology examines natural components that are too small to see. Imaging technology took a gigantic step forward in the 1680s when Anton van Leeuwenhoek ground a microscope lens sufficiently fine to see a living cell (a bacteria he had scraped from his teeth!). His microscope had one lens and the image he saw was approximately 250 times its natural size (250X magnification). Compound microscopes, like the ones we have in lab, use a second lens to magnify the image from the first and can increase the total magnification up to 1000X. One of our microscopes is also attached to a beam splitter that allows excitation light to be separated from emitted light. This allows us to perform fluorescence microscopy.
No matter how fine its lens, a light microscope cannot distinguish objects closer than 200 nm. The resolution of light microscopes is limited by both the wavelength of white light (300-700 nm) and the scattering of light by the object it strikes. For better resolution, great lenses must be combined with shorter wavelengths, such as those followed by electrons or lasers, and better ways of focusing the beam such as forcing it to travel through a vacuum or an oil. Linking the microscope to a computer with digital image processing can also enhance its images. The sample itself can also be stained or fluorescently tagged to improve detection of its features.
Today you will be shown how to use each of the microscopes in the main lab and you will practice visualizing and photographing a sample. You will be asked to focus a sample during the lab practical next time.

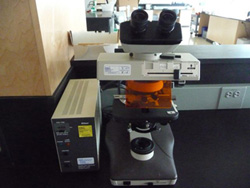
left: Conventional microscope and Right:Fluorescent microscope
Station 3: Introduction to Making Solutions (Self-Guided)
Today you will make 100 ml of a 0.5M sorbitol solution and measure its pH. Making solutions is a fundamental part of being in lab and the success of your experiments is absolutely dependent on doing it correctly and consistently. If you are unclear about any of the following instructions, be sure to ask for help.
Part 1: At the Balance

Balance
- Put on gloves and eye protection to weigh out solids. This protects you from the chemicals and the chemicals from getting contaminated with anything foreign on your hands. Sorbitol is not a dangerous chemical.
- Zero the balance with a medium size weigh boat on it. Weigh boats are kept in the drawer under the balance. The marked button marked -> O/T <- will zero ("tare") the balance and the display should read 0.0000 after taring. Be sure to close the balance doors when taring the balance.
- Use a spatula to measure 9.1 grams of sorbitol. To measure this, open the balance doors and hold the spatula and chemical over the weigh boat. Begin by adding only a small amount of the powder to the weigh boat. Once you determine how much that weighs, you can add correspondingly more. If you have weighed out too much, you can put some back as long as you have used a clean spatula and a clean weigh boat.
- Remove the weigh boat with your sorbitol from the balance, gently bend the ends together and pour the contents into a beaker. Tap the back of the weigh boat to loosen any powder that is stuck. The weigh boat can be discarded in the trash since sorbitol is not dangerous.
- Clean the balance with a brush. Clean the area around the balance with a wet paper towel.
Part 2: Measuring Liquids and Mixing
- Measure approximately 80 ml of distilled water - using the far left-hand faucet at any lab sink - into a 100 ml graduated cylinder. Read the volume in the cylinder by bringing it to eye level to see where the meniscus reaches. Add the water to the beaker with your sorbitol.
- Gently drop in a magnetic stir bar with a diameter approximately 1/2 that of the beaker. Magnetic stir bars are kept in the drawer below the balance.
- Put the beaker on the stir plate and turn the stirrer on slowly. The stir bar should spin fast enough to form a vortex in the center of the beaker. You do not want the stir bar to bump around in the beaker since this can break the beaker. If the stir bar is stirring unevenly, then turn off the stir plate, allow the magnetic stir bar to stop, and then start it again.
- Stir until all the powder is dissolved.
- Pour the solution back into your graduated cylinder.
- Add distilled water - from the labeled media bottle - up to 100 ml using a plastic disposable pipet. To open the pipet, hold it in one hand. With the other hand puncture the wrapper by pulling it against the top of the pipet (not the end with the tip!). Put the exposed end of the pipet into the pipet aid or bulb then withdraw the pipet from the rest of the wrapper. Place the tip of the pipet into the ultrapure water and withdraw enough water to "top off" your solution. Dispense the water into your sorbitol by submerging the tip of the pipet into the solution and releasing the water from the pipet. Stop when the graduated cylinder reads 100 ml. Extra water can be discarded into the sink and the used pipet can be discarded in the sharps waste container that is under the bench.
- Pour your sorbitol solution back into your beaker for when you reach the pH'ing station, and rinse the graduated cylinder with distilled water.
Station 4: Introduction to pH (Self-Guided)
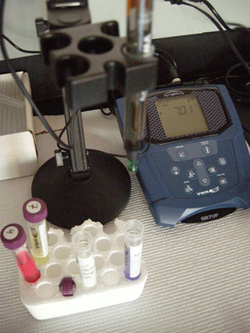
pH meter and electrode
- You will measure the pH of the sorbitol solution you've made (or you can use the stock that's available). Begin by putting the solution on the stir plate and start the stir bar gently spinning.
- Remove the pH electrode from the storage solution and rinse it over the waste beaker using distilled water from the wash bottle. A Kimwipe can be used to gently dry the electrode.
- Manipulate the mechanical arm that holds the electrode to place the electrode 1/2 way into the 15 ml conical tube with calibration buffer pH 7.0. The green measurement tip should be submerged. Press the "measure" button in the upper right corner of the pH meter's control panel. Wait for the reading to stabilize, for the "AR" light to stop flashing and note how close the reading is to pH 7.
- Rinse and dry the electrode then place it in your sorbitol solution. Use the mechanical arm to hold the electrode at the edge of the beaker and be careful not to let the stir bar hit (and break!) the electrode. Read the pH of your solution and let one of the teaching faculty know what you have found.
- Rinse and dry the electrode then return it to the electrode storage solution.
- Pour the sorbitol solution (but not the stir bar!) down the sink. Sorbitol is a sugar alcohol, which you can see is listed on the sink disposal checklist posted at each sink. Rinse the beaker with distilled water and return it to the station 3 area. Dry the stir bar and return it to the drawer.
Station 5: Introduction to Our Spectrophotometers (Self-Guided)
Color is created when a white light strikes a molecule that then reflects light of a certain wavelength and absorbs all the others. A spectrophotometer is an instrument that measures the amount of light absorbed by a sample. It does this by shining light of a particular wavelength into a sample and measuring how much light comes all the way through. Samples are held in cuvettes between the light source and the detector.
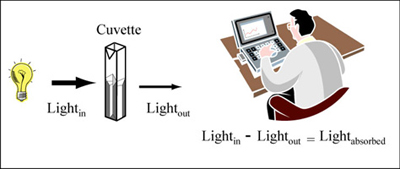
Measuring absorbance (Figure by MIT OpenCourseWare.)
Here are two important things to remember about spectrophotometers. First, different compounds absorb different wavelengths of light. Red pigments absorb blue light (light of ~300 nm wavelengths) and blue pigments absorb red light (light of ~600 nm wavelengths). Therefore all spectrophotometers have ways of adjusting the wavelength of light shining into the sample. The second important point is that the amount of light absorbed by a sample is directly proportional the concentration of that sample. This is a very useful relationship, making the spectrophotometer a valuable research tool.
In this assay you will investigate the calibration of your pipets by measuring the absorbance of the XC dilutions you made (or the sample solutions). According to Beer's Law, absorbance is linearly related to concentration by a wavelength- and substance-specific factor called the molar absorbtivity (ε). Thus, you'll see that the graph of absorbance versus volume of 0.01% XC is a straight line….or at least it should be!
Part 1: Using the DU 640 ("old") Spectrophotometer

Left: Old spectrophotometer and Right: cuvette holder
- Using your P1000, measure 1 ml of water into a plastic cuvette. This cuvette will serve as your blank for the spectrophotometer.
- Confirm that the machine is set to read absorbances at 600 nm (look at number shown in the middle of the screen) and that the visible light is on (lamp indicator is found at bottom of monitor screen).
- Put your blank into the spectrophotometer at position 1, which is furthest back in the instrument. Be sure the flat window of the cuvette and not the indented sides are in the light beam that travels from left to right (this is different from the beam's direction in the new machine!)
- Close the spectrophotometer door. Click "blank" (lower left of the screen). A "reading blank" message should appear. When the message is gone, then the blank is set.
- Replace the blank with your first sample. Close the door of the spectrophotometer. Click "read samples" (upper left of the screen). Write down this value.
- Measure all 12 samples. Remember to remove the final cuvette, then close the door.
- Hit the "clear" (in the upper right), and uncheck "save data" to erase your data.
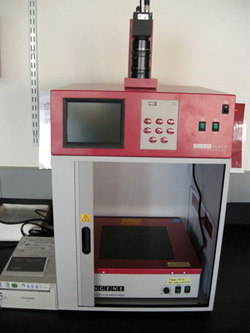
Part 2: Using the DU 730 ("new") Spectrophotometer

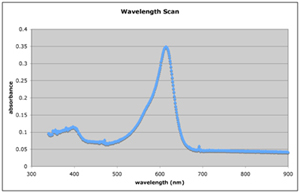
Left: New spectrophotometer and Right: Wavelength scan for XC solution
- Follow the touch screen to select "Fixed Wavelength" of 600nm.
- Insert your water blank into the cuvette holder. Be sure the window of the cuvette and not the frosty sides are in the light beam that travels from front to back (this is different from the beam's direction in the old machine). Close the door, then touch "Blank" to blank the machine.
- Replace the blank with one of the three XC dilutions that you prepared with your P200, close the door to the spectrophotometer then touch "Read." How well does this value agree with the value you measured using the "old" machine?
- Next, follow the touch screen back to the main menu and select "Scan Wavelength"
- Again, blank the machine with your water cuvette.
- Scan one of your XC samples. Does the output resemble the sample shown here? How does it differ (if at all)? Do you know why? Do you know why there is a peak at ~600 nm?
- Once you have finished your introduction to both spectrophotometers, you can wash the XC dilutions down the sink and the cuvettes can be discarded in the sharps bin that are under each bench.
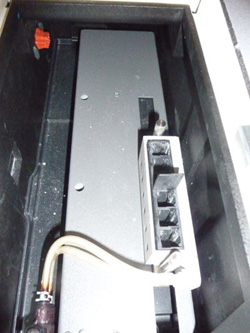
Station 6: Gel Documentation Station
This term we will use a gel documentation station to photograph agarose gels illuminated with UV light. Today you will practice focusing on an object and then capturing and printing the image. You must wear gloves when you touch any part of this equipment since a carcinogenic chemical (Ethidium Bromide) has been used here to visualize nucleic acids in agarose gels.
After you have put on gloves, try the following:
Gel documentation station.
- Open the gel documentation cabinet by sliding the door to the left.
- Put the test slide on the dark section of the UV transilluminator box that's on the bottom of the cabinet.
- With the cabinet door open, turn the power switch that's on the front of the cabinet to ON. This step may have been done already by another group.
- With the cabinet door open, turn the white light switch that's on the front of the cabinet to ON.
- On the upper control panel, touch the upper left button that reads, "LIVE."
- Using the image on the screen as your guide, center the test slide in the field of view.
- Focus and zoom as needed using the middle "zoom" dial on the lens that's at the very top of the cabinet. The label for each dial can be found on the left of the lens.
- When you are happy with the picture on the screen, close the cabinet door and turn the white light switch OFF. Now turn the UV switch that's on the front of the cabinet to ON. The UV light (302nm) can damage your eyes and burn your skin but the cabinet is fitted with a safety switch so the door must be closed for the light to turn on.
- Consider the image you now see on the screen. If the screen is black, use the upward arrow key on the keypad to increase the light exposure time. On the other hand, if you see red areas on the image this indicates saturation, and you should use the downward arrow key to decrease the exposure time.
- Once you are happy with the image, press "FREEZE" and then "PRINT" on the front keypad. If you insert a USB key, you can also hit "SAVE" to record a digital image.
- Turn the UV light switch to "OFF," then the Power switch to "OFF."
- Remove the test slide from the UV transilluminator and then close the cabinet door to leave the machine as you found it.
Benchwork and Scavenger Stations
Station 7: Introduction to Our Tissue Culture Facility (Self-Guided)
Our lab is beautifully equipped. The tissue culture facility has six hoods with germicidal lamps, six incubators for growing mammalian cells, four inverted microscopes, and a tabletop centrifuge. It also has a waterbath for warming up solutions and a refrigerator for keeping them cool.
Match the names of the scientists (below) with the equipment the names are taped to. If you have questions, ask one of the teaching faculty.
| Tissue culture hood (also called Biosafety Cabinet) | Feynman |
| CO2 tank | Darwin |
| 37° incubator | Mendel |
| 4° deli case | Newton |
| inverted microscope | Galileo |
| biosharps container | Curie |
| biohazard container | Franklin |
| centrifuge | Passteur |
Station 8: Introduction to Lab Safety Equipment (Self-Guided)
Locate the following essential safety items in or near the lab, and write down where they are:
- Safety shower
- Fire blanket
- Spill kits
- Eyewash stations
- Biohazard barrels
- Sharps bins
- Chemical disposal
Station 9: Graphing your Data (Self-Guided)
- Use Excel to prepare a graph of absorbance versus volume of 0.01% XC. If you haven't visited this station you can use this sample data (XLS) Some sample graphs are reproduced below and you should generate similar ones with your data. Be sure to include a trendline, displaying its equation as well as the r-squared value on the graph. The r-squared value reflects how well the data points fit the equation. A perfect fit will give an r-squared value of 1. If you are uncertain how to make such a graph using Excel, be sure to ask for help. We will use Excel a lot this semester.
- If the pipets were well calibrated and the measurements were done carefully, then the points should fall close to a straight line, and the r-squared will be close to 1. If one point seems way off, you can re-test that pipetman. If the repeat data still does not look linear, we can clean the inner workings of your pipetman. Note that the highest XC concentration may not fall in the linear range of the experiment.
- There should also be good agreement between the 20 ul measurements made with the P20 and the P200 as well as the 100 ul measurements made with the P200 and P1000. Is there?
- Confirm that your data can print from your laptops to one of the two printers in the lab (revolver, but not yellow-submarine, can do duplex printing).

Calibration curves for P20, P200, and P1000.
Station 10: Introduction to Lab Math (Self-Guided)
The information and exercises provided here are intended to refresh your memory of these concepts. If they are entirely new to you or if you are struggling with the practice problems, please ask for extra help. It is absolutely essential that you are comfortable with the information presented here.
Part 1: Metric system
This is the numerical language of science. Base units that you will most often use in this class are meters, grams, liters, and moles. These units will be appended with prefixes to modify the unit by a power of ten.
103 = 1000 = 1000/1 = 103/1 kilo (k-)
100 = 1 = 1/1 = 100/1 base unit (-g, -l, -mole…)
10-3 = 0.001 = 1/1000 = 1/103 milli (m-)
10-6 = 0.000001 = 1/1000000 = 1/106 micro (μ-)
Practice problems:
- The distance between two cells in 800 μm. How many mm is that?
- The amount of sorbitol you want to weigh is 1.9 g. How many mg is that?
- The volume you want to measure is 100 ml. How many liters is that?
- Your reaction generates 0.1 μmoles of product. How many mmoles is that?
Scientific notation expresses numbers so there is one digit to the left of the decimal point and that number is multiplied by a power of ten. 2334 becomes 2.334 x 10³ and 0.0041 becomes 4.1 x 10⁻³. Computations are easier with numbers in scientific notation and some numbers that are easier to write (602,214,199,000,000,000,000,000 versus 6.02 x 10²³).
Practice problems:
Convert the following to scientific notation
- 1000
- 2
- 0.0023
- 0.000000467
The metric system and scientific notation go hand in hand, making unit conversions straightforward. For example 100 μl can be converted to ml by writing the starting volume in scientific notation (1.00 x 10² μl) and multiplying by the power of ten that separates the units (1 ml = 1 x 10³ μl). Set up every equation so the units will cancel properly when you multiply through.
Practice problems: Be sure you can express your answers in scientific notation.
- How many ml is 100 μl?
- How many mg is .023 g?
- How many mmoles is 250 μmoles?
Note: When using scientific notation in the lab, be sure to keep in mind significant digits. Just because a calculator outputs a value to the seventh decimal point, doesn't mean that you actually know that value to such precision! Please be thoughtful when working with numbers both from direct measurements and from calculations.
Part 2: Concentrations
Molarity (moles/liter) is a common expression of concentration. When making a solution of a particular molarity, you need to know three things: the desired molarity, the desired volume and the formula weight of the compound to be dissolved. The best place to find the formula weight (grams/mole) is on the chemical's bottle. Calculations are performed by setting up an equation so that the units cancel, leaving grams in the numerator and volume in the denominator.
Another common expression of concentration is percent. Percent solutions are always based on 100 ml. For powdered substances, percent solutions reflect the weight in a 100 ml volume ("w/v"). For example a 10% solution of NaCl is 10 grams in 100 ml of water. In fact a 10% solution of any powdery substance is 10 grams in 100 ml. For liquids, percent solutions reflect the volume in a 100 ml final volume ("v/v"). For example a 70% ethanol solution is 70 ml of 100% ethanol and 30 ml of water. Remembering that 1 ml of water weighs 1 gram may help you remember the w/v and v/v expressions.
Practice problems:
- You want to make 100 ml of a 0.5M sorbitol solution. The formula weight of the substance you want to dissolve is 182. How many grams will you measure?
- You want to make 10 ml of a 0.01% (w/v) solution of XC. How many grams will you dissolve?
- How would you make 100 ml of an aqueous solution that is 5% (v/v) acetic acid and 5% methanol?
Part 3: Dilutions
Many solutions are made by diluting concentrated stock solutions. Dilution factors of 1:2, 1:5, 1:10 and 1:100 are common. These dilutions are made by diluting one "part" stock with 1, 4, 9 or 99 "parts" water. For example, you could make 100 ml of a 0.5M sorbitol solution by mixing 10 ml of a 5M stock solution with 90 ml of water. This is a 1:10 dilution of the stock. The dilution factor can be converted to a fraction to determine the solution's final concentration (5M x 1/10 = 0.5M).
When the dilution factor is less obvious, the formula C1V1 = C2V2 can be used, where C1 is the starting concentration of the stock solution, C2 is the desired concentration, V1 is the volume of stock you'll need (usually this is your unknown) and V2 is the final volume you want to make. For example, to make 1000 ml of a 0.2M Tris from a 1.5M stock you would multiply 1.5M (V1) = 0.2M (1000) to find that you will need 133 ml of the stock. To determine how much water to add you would subtract V2 – V1, in this case 1000 ml –133 ml = 867 ml of water.
When solutions must be diluted several orders of magnitude, then serial dilutions are made. The concentrated stock is progressively diluted, for example using a 1:100 dilution as the new "stock" in another 1:100 dilution. Such a serial dilution produces a solution that is 10,000 times less concentrated than the starting material. One benefit to serial dilutions is that small volumes of each dilution can be made accurately. A drawback is that any pipetting or calculation error is propagated through every dilution.
Practice Problems
- How would you make 50 ml of a 1:5 dilution?
- Give the volume of stock and the volume of water necessary to make 50 ml of a 0.25 M solution starting with a 2M solution.
- A concentrated culture of bacteria has approximately 1 x 10⁸ cells/ml. What is the concentration of bacteria after it has been diluted 1:100? What is the concentration of bacteria if a 1:2 dilution was made of the 1:100?
For Next Time
- Review today's lab to prepare for the lab practical that you and your partner will take together.
- Complete the required EHS Training on-line [only for MIT community, not available to OCW users].
- There are two web-based training modules required for 20.109. They are Chemical Hygiene Training and Managing Hazardous Waste. Chemical Hygiene includes 7 sections and 6 quizzes with an estimated completion time of 1 hour, while Managing Hazardous Waste has one quiz and should take less than 1/2 hour to complete. Both courses can be accessed through MIT's Environmental Health and Safety page. [NOTE: these modules are only available to the MIT community, requires a valid MIT certificate.]
- If you have completed EHS training in a UROP or in another lab class, you do not need to repeat the training but you do need to print out your training record to hand in.
- From the EHS training page select the second button labeled "I have EHS training requirements for an academic subject."
- Your summary page ("My EHS Training") should show Chemical Hygiene and Managing Hazardous Waste as requirements for 20.109. Click on the purple button "Go to Web Classes" right above the training requirements section. You may stop and start the web-based courses as many times as you need to complete them; the software keeps track of your progress in the course.
- Print the certificates of completion to turn in next time.
- Register for an account on OpenWetWare by filling out the "join OWW" form. Once you get an account:
- familiarize yourself with using the wiki by reading the "OpenWetWare Basics" page.
- add the 20.109 home page to your "watch" list and update your preferences so you'll be notified by email when an announcement is made.
- Prepare for the first day of Module 1 by reading the Module 1 Overview and Day 1 introduction.
« Back to Labs