Modules: 1.1 | 1.2 | 1.3 | 1.4 | 1.5 | 1.6 | 1.7
Introduction
"Divide and conquer" may be an effective military strategy but its usefulness is not limited to that arena. The reductionist approach has been an important means of understanding complex biological processes. By tweezing apart networks and pathways, the components that contribute to the overall behavior of the system may be understood in great detail. As you've seen, however, there isn't always a straightforward way to reassemble the component level understanding into a predictive and quantitative model for the system. Remember that's what happened with the T7 model that you read about last time, and the author's response to the limited success of the models is what makes that T7 work so novel. Rather than continue to tweeze apart and better understand the natural example, they built a surrogate T7 that was a better template for experimental work, easier to manipulate and analyze, easier to characterize and understand. Now you will help design a surrogate M13.

T7.1 refactoring algorithm.
To help with your refactoring efforts, a step-by-step example is provided here. It's inspired by the T7 algorithm described in the Chan, et al. paper. The example provided here will almost certainly raise some but not all of the issues you will encounter as you try your own refactoring, so read it carefully and then use some or none of the example for your own work.
This example addresses the overlap in the genes encoding p9 and p8. In the natural version of M13KO7, the promoter for gene 8 is in an unusual place and the stop codon for gene 9 overlaps the start codon for gene 8. This arrangement makes it nearly impossible to regulate expression of p9 and p8 independently—akin to the gas pedal of your car if it changed both the speed you travel and the volume of the radio.
Step 1: Identify Parts
As you've seen, many bacterial genes have definable "parts," i.e. genetic elements with particular purposes and without which the function of the DNA is impaired. Four parts make up a typical gene expression cassette: a promoter, a ribosome binding site, an open reading frame, and a terminator. In the Van Wezenbeek, et al. M13 sequencing paper that was published in 1980, these parts were identified. Tables of promoter, RBS and terminator elements from this paper are reprinted on the discussion page associated with this lab.
Another useful resource for refactoring M13 is the Registry of Standard Biological Parts. Many of the functional elements of the M13KO7 genome have been entered into that database. A table describing them all is included in the "reagents list" for today's lab.
Armed with this information and the M13KO7 sequence file, a working copy of the sequence can be copied into a new MSWord document and the relevant portions of the sequence annotated. The following color scheme was used to refactor the genes for p9 and p8, and it would be very helpful if you could follow the pattern when you refactor your portion of the genome. (Note: In the previous sentence, "very helpful" means that you must follow this labeling scheme for genetic elements, or a superior scheme of your own invention, in which case you must provide a legend for your new scheme. If you don't do this it would be impossible to evaluate your work in a timely fashion, or quickly place DNA synthesis orders.)
- RBS = blue box
- promoters = underlined with -35 and -10 in blue letters, bolding -10, -35 nucleotide
- transcriptional terminators = if relevant, boxing in grey
As you box and color the features, you should note above the region what's what
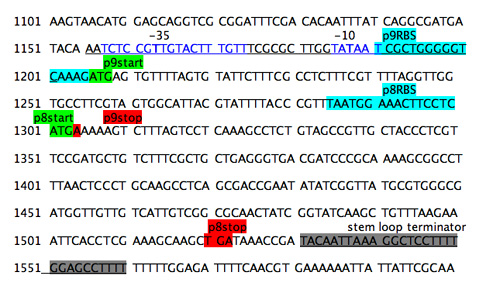
Step1: identify parts
In reading just a little about promoter elements, for example in this refresher on bacterial promoters, it's clear that the gene 8 promoter is much further upstream than most promoters are from the ORFs they direct. So it's worth figuring out if this promoter is still considered the relevant one. The 1980 reference that identified the promoter seems pretty confident:

Promoter for gene 8.
From Van Wezenbeek P.M., et al. "Nucleotide sequence of the filamentous bacteriophage M13 genome: comparison with phage fd." Gene 11 (1980): 129-148. Courtesy of Elsevier, Inc., Science Direct. Used with permission.
However it's worth looking for more recent data. Some useful sites for the M13 refactoring are the NCBI taxonomy of viruses and the International taxonomy of viruses.
Step 2: Characterize Existing Parts
Promoter
After noting the unusual position of the promoter for gene 8, it seems worth taking some time to compare the existing parts to "consensus" or average parts to know how well they compare.
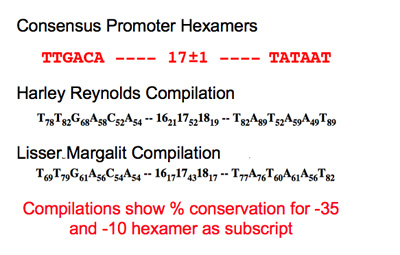
Promoter characterization table.
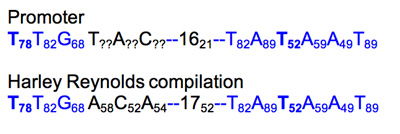
Weights were added as subscripts to each position in the promoter hexamers. If the base does not match the compilation base, then add ? and change to black.
RBS
To estimate the strength of the M13 RBS sequences read: this review site which includes some useful characterization information. Compare the M13 RBS to the characterized ones as well as the consensus sequence to get some sense of the relative strengths.
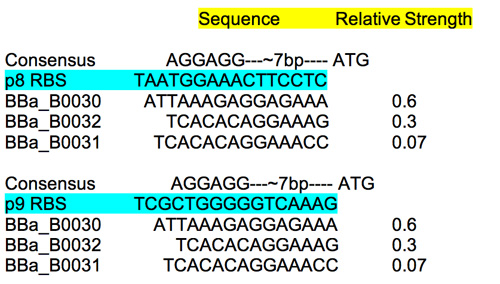
RBS characterization.
Step 3: Identify Flanking Restriction Sites
An M13KO7mut8 scaffold (PDF) has been made in the Endy lab to facilitate the refactoring work you are undertaking (Bryan Hernandez, a 20.109 student from last term, helped to design these changes; Felix Moser, a technician in the Endy Lab, made the changes and tested the resulting phage). The additional restriction sites were made by de novo DNA synthesis plus a little site directed mutagenesis. The resulting DNA sequence has 8 new unique restriction sites dotting the genome. The changes needed to add these 8 new sites do not change the resulting protein sequences and do not affect known parts like promoters or ribosome binding sites; however, for unknown reasons, the phage appears to grow about 50% less well than wild-type M13.1 (only very early characterization experiments have been done, titering the production of phage from cultures). The following three pictures should help you understand the overall scheme of where these new restriction endonuclease sites are, and how they might help you to make changes:
Here is the entire M13KO7 plasmid, showing all the unique restriction endonuclease sites (notice how most of the unique cutters are outside of the M13 region of the plasmid!):
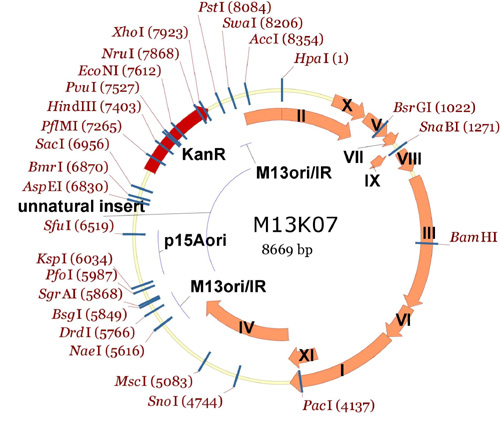
Entire M13KO7 plasmid showing single cutters.
Next, here is a "zoom-in" view on a section of the M13 genome from the entire M13KO7 plasmid, from gene II through gene III (again note how few unique restriction sites can be found):

M13KO7 map showing single cutters in gene II to gene III region.
Finally, here is the same section for the M13.1 genome, with the new sites added:
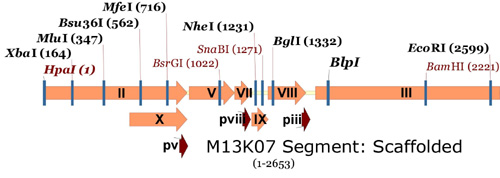
M13.1 Genome.
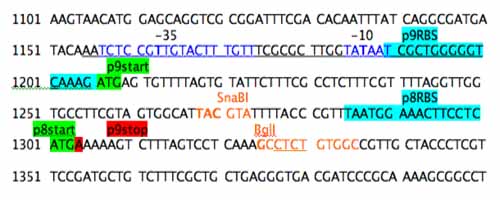
Now, you can confirm that these unique sites exist using NEBcutter from NEB and the M13KO7mut8 scaffold (PDF) information. For this example the restriction sites that will be useful for refactoring the genes for p9 and p8 were changes to orange font and the enzyme name was noted above the sequence.
Step 4: Redesign Parts
The refactoring example here addresses both the promoter region of the gene for p8 and the overlap between the gene 9 stop codon and the gene 8 start codon. Unstuffing the overlap requires adding some sequence between the stop and the start. A unique restriction site was added as spacer sequence.

Step 4a: separate stop and start.
The start codon will not be read without a RBS upstream but a simple cut and paste of the usual p8 RBS will provide a nice pair of direct repeats for the phage to delete. Additionally since the next step will be to move the promoter closer to the gene for p8, presumably strengthening it, it seems wise to weaken the RBS for gene 8. A chimeric RBS was added that mixed the consensus region of the RBS from gene 9 with the flanking sequences from the RBS for gene 8. In a refactoring example when a large portion of sequence is being duplicated, such an ad hoc approach isn't feasible. Instead programs that shuffle codons and consider codon bias of the host should be used.

Step 4b: add chimeric RBS.
A promoter to direct RNA polymerase to gene 8 separately from the gene 9 was added. The best strength for this promoter is guesswork. Since gene 8 does not normally have a promoter nearby, it seemed wise to add a weak (i.e. far from consensus) promoter so the promoter from the arabinose BAD operon was chosen and inserted between the unique restriction site and the chimeric RBS.

Step 4c: add weak promoter.
To polish off this refactoring, the spacer sequence between the -35 and the -10 elements would need to be specified. There could be some clever things to do with that spacer, for example add a unique restriction site. And TADA--a new and improve M13KO7! Now you give it a go....
Protocols
Part 1: M13.1
Refactor a portion of the M13KO7 genome between the unique HpaI site in gene II through the unique BamHI site in gene III, guided by the algorithm described in the Refactoring T7 paper Supplementary Figure 1 and the gene 9/gene 8 refactoring example in the introduction to today's lab. For inspiration or comparison, you can look over the list of modifications proposed for the module 1 portfolio assessment assignment. If you make new parts for the registry or refine existing ones, add your parts to the M13 refactoring workpage. Before you leave today you and your partner should hand in one copy of this refactoring effort, but you should also email a copy to yourself to refine your ideas further before submitting it in your portfolio.
Part 2: Oral Presentation Instruction
Over the course of the term, everyone taking 20.109 will be making two presentations to the class. One will be a presentation of a primary journal article related to either genome or expression engineering. The other presentation will be of a research idea for Module 3. Today our wonderful coach from the Writing program will come to lab to give a talk about giving talks. This presentation should be a welcomed chance to learn what's expected when you speak (in 20.109 and elsewhere) and to gather some great tips for giving polished and interesting seminars. You can follow up this instruction by re-reading the Guidelines for oral presentations.
Part 3: Sequencing
The invention of automated sequencing machines has made sequence determination a fast and inexpensive endeavor. The method for sequencing DNA is not new but automation of the process is recent, developed in conjunction with the massive genome sequencing efforts of the 1990s. At the heart of sequencing reactions is chemistry worked out by Fred Sanger in the 1970's which uses dideoxynucleotides.
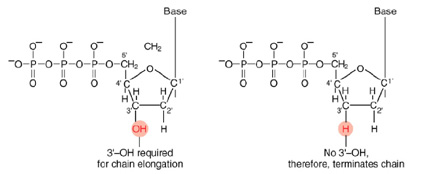
Normal Bases Versus Chain-terminating Bases.
Photo removed due to copyright restrictions.
Sequencing gel
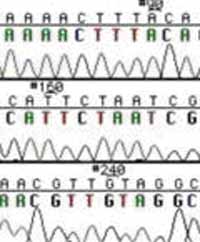
Sequence Trace Data.
These chain-terminating bases can be added to a growing chain of DNA but cannot be further extended. Performing four reactions, each with a different chain-terminating base, generates fragments of different lengths ending at G, A, T, or C. The fragments, once separated by size, reflect the DNA's sequence. In the "old days" (all of 10 years ago!) radioactive material was incorporated into the elongating DNA fragments so they could be visualized on X-ray film (image on left). More recently fluorescent dyes, one color linked to each dideoxy-base, have been used instead. The four colored fragments can be passed through capillaries to a computer that can read the output and trace the color intensities detected (image on right). Your sample will be sequenced in this way on an ABI 3730 DNA Analyzer.
Sequencing will be one of the last steps to assess the success of your work on the gene for p3. From your experiment last time, you may feel confident that your oligonucleotide pair was successfully inserted into the M13KO7 genome. What remains unclear, however is which direction the insert has gone in. Since the restriction sites are so close together, the orientations can't be distinguished by restriction analysis. To know if the construct you have in hand is in the intended or the reverse direction, it will be necessary to sequence the region.
Sequencing reactions require 200-500 ng of plasmid DNA, and 3.2 pmoles of sequencing primer in a final volume of 12 μl. The miniprep'd plasmid should have ~1 ug of nucleic acid/µl but that will be a mixture of RNA and DNA, so we will guess at the amount of plasmid DNA there and use 1 µl of your miniprep'd DNA/sequencing reaction.
Prepare an eppendorf tube with enough material for two sequencing reactions, namely
- 2 µl of your plasmid DNA candidate(s)
- 6.4 µl of a 1:100 dilution of the sequencing primer NO198
- 15.6 µl sterile water
Pipet this solution up and down to mix and then transfer 12 µl to one of the tubes in the 8-tube strip we will turn in at the biopolymers facility in E17 for sequencing. The data will be available for you to examine one week from today. Keep your fingers crossed.
DONE!
For Next Time
- Exchange the writing assignment you handed in today with your lab partner for comments/reactions. Begin by reading the tips for peer review from Neal Lerner (PDF).
- Then, as you read your lab partner's writing, be a thoughtful and sensitive reviewer. You will do your partner a disservice if you say the writing is great when it's not. Similarly, you will waste your time adding comments that are too harsh or too obscure to be integrated into a revision. You should begin your review by restating what you think the point of the paragraph is. This will help your partner know if the point got across. Next you should restate what evidence was provided and, if appropriate include editorial comments about their value (e.g. "Natalie, the point about all cells requiring energy is very general and so you might want to say this before you say that the word "cells" rhymes with "bells.") Finally you should comment on the writing itself. If a sentence was confusing, say so and if at all possible, say why (e.g. "Natalie, the verb in your sentence that starts "when life began ages ago" is not found until the 46th word, making the point of the sentence hard to get"). Print out two copies of your review, one to hand in and one for your lab partner. Keep your fingers crossed that your lab partner is as thoughtful a reviewer as you are.
- Prepare a figure of the agarose gel you ran last time. The images are posted on the discussion page associated with that lab. This figure will be included in your Module 1 portfolio assessment assignment so a good effort now will allow us to return your work with comments and what you submit later will be that much better. If you need information about how to prepare figures, look at our Guidelines for writing a lab report.
- Gain some familiarity with protein gels if you haven't ever run one, or if it's been a while. One good link to start with is Wikipedia: Polyacrylamide gel.
Reagents List
- Sequencing primers
- M13KO7seq_2101_fwd
- NO198 5'- CAA GGC ACT GAC CCC GTT AAA ACT TAT TAC -3'
- M13KO7seq_2151_fwd
- NO199 5'- AAA AGC CAT GTA TGA CGC TTA CTG GAA CGG -3'
- M13KO7seq_2101_fwd
- Genetic parts for M13KO7 in the Registry of Standard Biological Parts
| GENETIC ELEMENTS | PROMOTERS | RBS | CODINGS |
|---|---|---|---|
| Arbitrary starting point | |||
| gII | BBa_M13102 | BBa_M13502 | BBa_M13002 |
| gX | BBa_M13110 | BBa_M13510 | BBa_M13010 |
| gV | BBa_M13105 | BBa_M13505 | BBa_M13005 |
| gVII | BBa_M13507 | BBa_M13007 | |
| gIX | BBa_M13509 | BBa_M13009 | |
| gVIII | BBa_M13108 | BBa_M13508 | BBa_M13008 |
| Transcriptional terminator | |||
| gIII | BBa_M13103 | BBa_M13503 | BBa_M13003 |
| gVI | BBa_M13106 | BBa_M13506 | BBa_M13006 |
| gI | BBa_M13101 | BBa_M13501 | BBa_M13001 |
| gXI | BBa_M13511 | BBa_M13011 | |
| gIV | BBa_M13104 | BBa_M13504 | BBa_M13004 |
| M13KO7 ori/KanR/p15a ori | |||
